Define Form Actions
Form actions enable you to:
- change a record's business status
- generate a report
- run a server side script
- run a business decision matrix
- call a formula.
Once defined, you can use form actions that can be triggered on-demand, for example by adding a form action to a form button. For more details on how to add the form actions to the buttons, check the Form Actions Buttons section.
Create a Form Action
- On the configuration page of the form, click the Actions tab. Two grids are displayed : one is Form Actions and the other is Action Group.
- At the top of the Form Actions section, click Insert.
- In the Form Action window:
- Enter a name for the form action.
- Click the Plus (
 ) sign next to the execute label to add a command.
 - Click the labels in the command to select the desired operands such as change business status from status/ generate digital document/ call custom processor/ call business matrix/ call a formula with mapping. Then, select the status/ the document/ the processor/ the matrix.
- Go back to step b. if you wish to add additional commands. To remove commands from the list, click the
 button.
 - Click Save .
Available Form Action Commands
| Command | Description | Operands | Examples |
|---|---|---|---|
| Change Business Status from Status | Changes the record's workflow status based on the entity's attached business workflow. For details, see the Business Workflows Processor documentation. |
|
Change the status from Draft to Active |
| Generate Digital Document | Generates a predefined report. For details, see Analytics. | Report name. | Generate a contract or an agreement |
| Call Custom Processor | Runs a predefined on-demand server automation script. For details, see Create On-demand Server Automation Scripts. | Server automation script name. | Call the E-sign processor or an endpoint. |
| Call Business Matrix | Runs a predefined business decision matrix. For details, see the Business Decisions Processor documentation. | Business decision matrix name. | Call the eligibility matrix. |
| Call Formula with data mapping | Runs a predefined formula for calculation of input data. See Use Business Formulas in a Digital Journey. | Business Formulas | Call the formula for calculating the policy of an insurance. |
Attach an endpoint in Form Action
In app data forms, in Form Actions, a user can map between an automation script input/output parameters and form attributes.
-
Create one Platform Data Entity that is default for a app data form.
-
Create a server script with Input Parameters and the Output structure is one of the following, depending on your needs:
- [none]
- “Entity"
- “Custom“
- “Boolean“.
If the endpoint has no output structure type, then no output mapping form is displayed. For more details, see Create On-demand Server Automation Scripts.
- In the FintechOS Studio main menu, navigate to Servicing > Service Extension Apps > App Data Forms
- Open the Actions tab and, in the first grid, click Insert.
- Insert a name for the action.
- Click the execute button and select the ''Call custom processor''.
- Select from the drop-down the endpoint created.
- Map the input attributes.
- Map the output attributes.
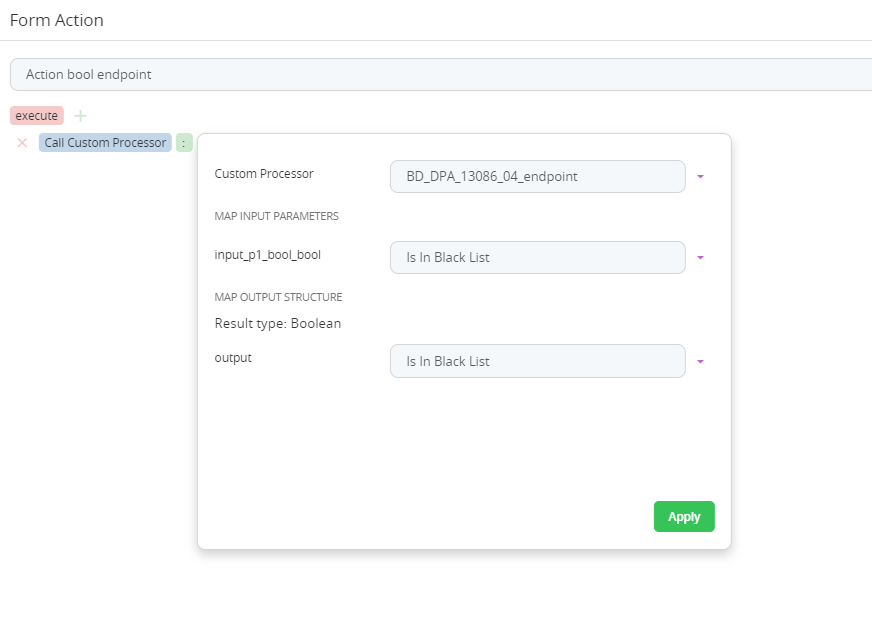
- Click Apply. Click Save.
- Click Save and close.